Install Request Tracker
Since covering an install of Request Tracker 4 on Debian (Part 1/2, 2/2), my most common request has been a guide for Ubuntu. A lot of the material is the same, since Ubuntu is a derivative of Debian.
This guide assumes you are installing a fresh install of Ubuntu 12.04 LTS Server onto a new computer or virtual machine. I have chosen the latest LTS release as it will be supported for far longer than regular releases. These instruction should also work on any version of Ubuntu released after 11.10 (minor changes may be required).
Feel free to change settings to suit your environment and use your favorite text editor (vi, emacs, butterflies etc) instead of nano.
I have chosen PostgreSQL over MySQL as it makes enabling fast full-text searching in RT4 much easier, but feel free to use MySQL instead.
Requirements
You will need to have a few basic things before proceeding:
- Spare server (or VM) with 1GB+ RAM and at least 9GB HDD (more is better)
- Email account for RT (I have used rt@example.com)
- Email account for RT comments (I used rt-comments@example.com)
- A basic understanding of Linux, networking etc
Ubuntu Install
Install Ubuntu using the Server 12.04 LTS .ISO image (64-bit recommended)
- Select Language (English)
- Install Ubuntu Server
- Select Language (English)
- Select your location
- Detect keyboard layout (No)
- Select Keyboard Layout
- Edit the Hostname (rt)
- Create your non-root account
- Encrypt your home directory
- Configure the clock
- Partition Disks
- Wait while the base system installs (make a coffee..)
- Configure proxy if required
- Wait while the installer runs a few tasks
- Configuring tasksel (Install security updates automatically)
- Software selection (OpenSSH Server – we will add the rest later)
- Wait while the installer downloads and installs packages
- Install the GRUB boot loader
- Finish install, computer reboots, remove CD
Network Setup
Configure a Static IP address and DNS resolution
sudo nano /etc/network/interfaces
Change the following two lines from:
allow-hotplug eth0
 iface eth0 inet dhcp
To suit your environment:
auto eth0
 iface eth0 inet static
 address 192.168.1.100
 broadcast 192.168.1.255
 gateway 192.168.1.1
 dns-nameservers 192.168.1.1
Restart networking and test:
sudo /etc/init.d/networking restart
ping google.com
Not covered here, but now is a good time to configure SSH (preferably using certificates). Continuing the install using SSH from your desktop/laptop will make it easier to copy/paste config files. On Windows I highly recommend PuTTY.
Install Required Packages
Update your available packages, install Request Tracker 4, Apache 2, PostgreSQL and the lynx browser:
sudo aptitude update
sudo aptitude install request-tracker4 \
 rt4-apache2 rt4-clients rt4-db-postgresql apache2-doc lynx \
 postgresql apache2 libapache-dbi-perl fetchmail
You now need to configure some basic RT settings:
- Name for this RT Instance ($rtname) – example.com (pick something unique to your organization like your domain name)
- Handle RT_SiteConfig.pm Permissions – Yes
- More stuff installs.. (time for more coffee)
- Configure database for request-tracker4 with dbconfig-common – Yes
- Set the PostgreSQL application password for request-tracker4
- Set the RT root password (note that this is not the system root user)
- More stuff installs..
Email Configuration
You can choose any MTA you want but I have decided to keep the Ubuntu default of Exim4.
Please note that your email setup may be different and require additional configuration. For example if you use Google Apps you will need to configure authentication and SSL. I have added a couple of links at the end of this page with further information.
To reconfigure Exim:
sudo dpkg-reconfigure exim4-config
Configure Exim4 to work in your environment:
- Select: mail sent by smarthost; received by SMTP or fetchmail
- System mail name: example.com
- IP-addresses to listen on for incoming SMTP connections: leave at default
- Other destinations for which mail is accepted: leave at default
- Machines to relay mail for: leave blank
- IP address or hostname of the outgoing smarthost: smtp.isp.com
- Hide local mail name in outgoing mail?: Yes
- Visible domain name for local users: example.com
- Keep number of DNS-queries minimal (Dial-on-Demand): No
- Delivery method for local mail: mbox format in /var/mail (default)
- Split configuration into small files: No
Test outbound mail by emailing a file to yourself (edit to suit):
mailx -s "Exim4 email Test" you@example.com < /etc/fstab
Check your e-mail to see if this is working. If the email doesn’t come through in a few minutes you might want to check the Exim4 configuration.
Basic RT Configuration
Edit the RT config file
sudo nano /etc/request-tracker4/RT_SiteConfig.pm
Find and edit the following lines from:
Set($CorrespondAddress , 'rt@svr011.example.com');
Set($CommentAddress , 'rt-comment@svr011.example.com');
to
Set($CorrespondAddress , 'rt@example.com');
Set($CommentAddress , 'rt-comment@example.com');
Also paste the following lines to the end of the file, just above the last comment block, then save and exit:
Set($MaxAttachmentSize , 10000000);
Set($FriendlyFromLineFormat, "\"%s\" <%s>");
Apache2 Configuration
Edit the apache2 default available sites:
sudo nano /etc/apache2/sites-available/default
Find the end of the file “</VirtualHost>” and add the following line just above it:
Include /etc/request-tracker4/apache2-modperl2.conf
RedirectMatch ^/$ /rt
Save the file and exit.
To enable mod_rewrite run the command:
sudo a2enmod rewrite
And then restart apache2:
sudo service apache2 restart
RT Web Configuration
You should now be able to see the RT Web Login Screen (http://rt.example.com/rt/) and be able to login with the username “root” and the password configured during installation (note. this is the root user for RT not your system).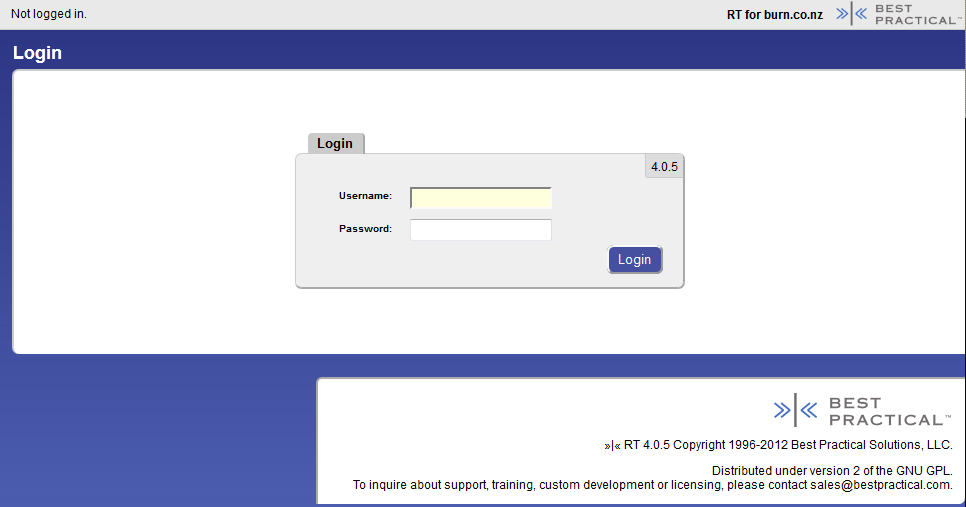
From the home screen browse to Tools -> Configuration -> Queues -> Select. 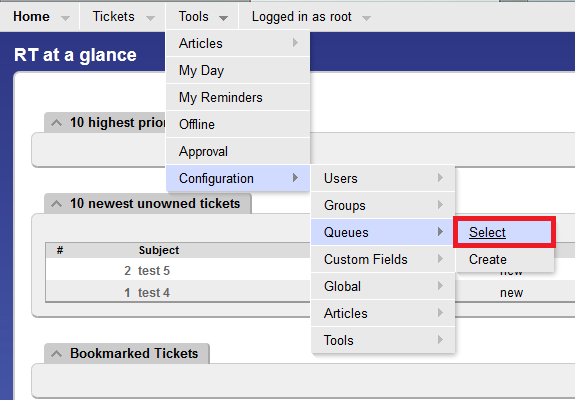
Under name click on the General queue as shown below.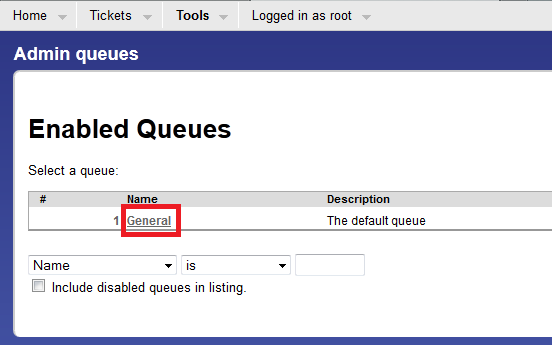
You can now edit the configuration for the queue. Change the Description as this will appear as the senders name in emails from the queue.
Important: If you change the Queue Name, you need to modify the fetchmailrc (see below).
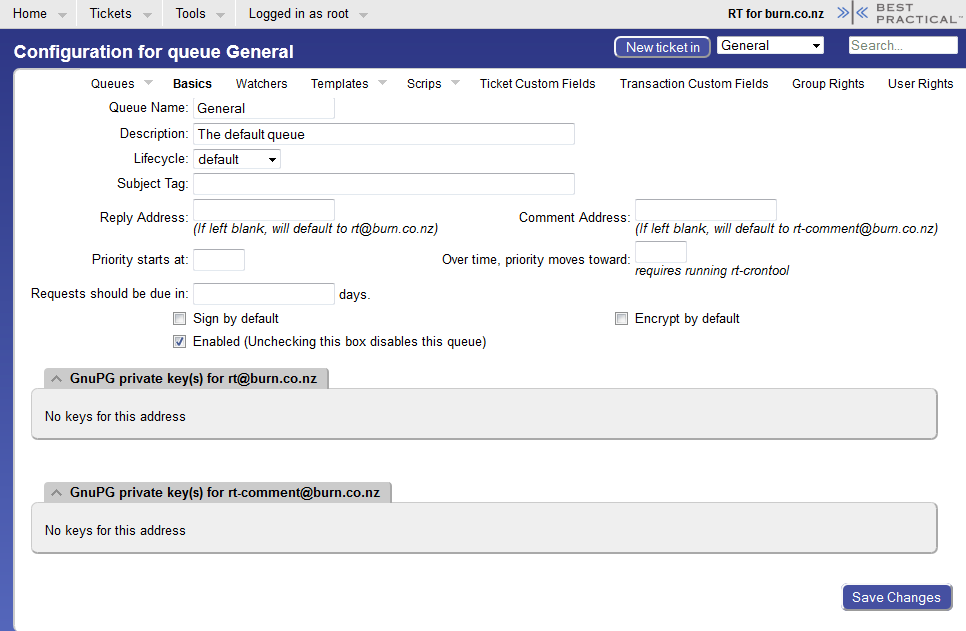
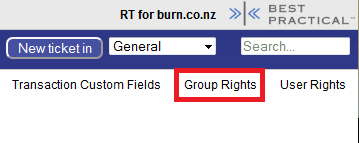
When you are happy with the queue settings click on Group Rights (top right-hand corner):
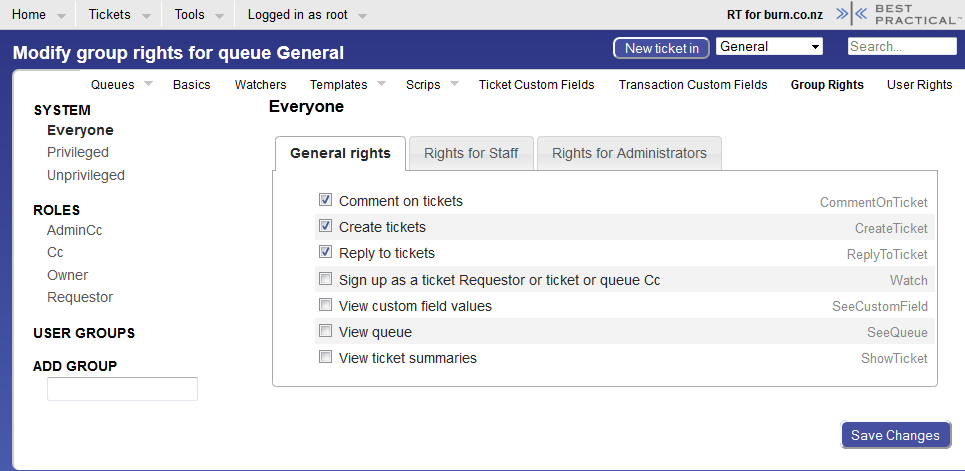
As below make sure Everyone is selected before ticking the boxes next to:
- Comment on tickets
- Create tickets
- Reply to tickets
and then click Save Changes.
fetchmail Configuration
Enable the fetchmail daemon to start:
sudo nano /etc/default/fetchmail
Modify the last line and save:
START_DAEMON=yes
Create a new fetchmailrc config file and edit it:
sudo nano /etc/fetchmailrc
Paste the following lines into fetchmailrc and edit to suit:
set daemon 60
set invisible
set no bouncemail
set syslog

poll pop3.example.com protocol pop3
 username "rt@example.com" password "password"
 mda "/usr/bin/rt-mailgate --queue general --action correspond --url http://localhost/rt/"
 no keep
;

poll pop3.example.com protocol pop3
 username "rt-comment@example.com" password "password"
 mda "/usr/bin/rt-mailgate --queue general --action comment --url http://localhost/rt/"
 no keep
;
Important: If you changed the Queue Name during RT Web Configuration, you need to modify the queue name in fetchmailrc or incoming email will not work.
Restart the RT host:
sudo shutdown -r now
While you are waiting send an email to RT (eg rt@example.com) from your email account.
Once the server is back fetchmail should retrieve the email within 60 seconds & forward it to RT. You will then get an email reply and the newly created ticket should appear in the web interface.
crontab Configuration
There are a few jobs which you will want to run regularly. The easiest way is to add these to cron:
sudo crontab -e
Add the following lines then save and exit:
0 0 * * * /usr/sbin/rt-email-digest -m daily
0 0 * * 0 /usr/sbin/rt-email-digest -m weekly
0 * * * * /usr/sbin/rt-email-dashboards
What Now?
Request Tracker should now be running and tickets can be received. You should create a group for your IT team with increased permissions to the queue, and add your team members to it. I also strongly recommend establishing a regular backup schedule for at least the RT database.
Over the next few months I will try to add more RT content including adding queues, integrating with an AD domain, and enabling fast full-text searching.
Request Tracker Links
http://bestpractical.com/rt/
http://requesttracker.wikia.com/wiki/HomePage
http://blog.bestpractical.com/
http://bestpractical.com/rt/lists.html
http://www.bestpractical.com/rt/docs/4.0/backups.html
Additional links
http://requesttracker.wikia.com/wiki/WithEmailFacility
http://www.hollenback.net/index.php/RequestTrackerOnCentos5
https://help.ubuntu.com/12.04/serverguide/
http://wiki.debian.org/Manual-Howto
http://pkg-exim4.alioth.debian.org/README/README.Debian.html
http://wiki.debian.org/GmailAndExim4

Pingback: Installing Request Tracker 4 on Debian (1/2) | Burn.co.nz
This works great… one question, now that 4.0.11 is out how do I update from 4.0.6 to 4.0.11 ?
Ubuntu (and upstream Debian) are quite slow to package new versions, and probably always will be. Security fixes are often added, so the current 4.0.6 package may have patches from newer versions of RT. If you really need a newer version urgently you can manually install from source.
My smtp server (which is also remote relative to the environment of the RT server) requires authentication. How would that change this setup routine?
Hi Will, you will need to take a few extra steps after initially configuring Exim. There are a few variables so it can take a bit of experimenting to get SMTP Smarthost Authentication working correctly.
Open the Exim4 client password file using
nano /etc/exim4/passwd.clientand add your remote SMTP server on a new line in the formatsmtp.example.com:user@example.com:password(note: the username may be a different format). Run the commandsupdate-exim4.conf; invoke-rc.d exim4 restart; exim4 -qffto update Exim config, restart the service, and resend any queued email.If your SMTP server requires TLS it will take a bit more work. The Debian Gmail and Exim4 Wiki page is a good start.
If you have any further questions just let me know.
I just followed your instructions and configured this in less than an hour. This is my first exposure to Exim and have always used Postfix, but wanted to follow line by line to ensure it worked quickly. I have experience using RT in the past about 5 years ago, but version 4 seems to have changed it tremendously.
Thank you so very much for a perfect and clean guide. I’ve bookmarked your page and would love to see single sign-on with Microsoft AD LDAP in the future as well as your intent to demonstrate adding queues and helping us with the basics.
I’ll get to tinkering and learning as it was very simple to set this up (so I can always spin up a new VM if its too far gone).
Cheers!
-Chris
Hi Chris, thanks for the feedback! I have configured RT4 with Postfix and it isn’t really much different, but I always like to use default packages when explaining things. I keep chipping away at documenting a basic setup with queues, users and groups. It should be up soon.
best regards
-Ben
Thanks Ben,
I did find a configuration error on my part and I’m not sure how to resolve it. I have it configured as such:
http://tickets.example.com/rt with the email domain is example.com using rt@example.com and rt-comments@example.com.
If I try to send myself email to another account on example.com, my guess is that exim is attempting to deliver locally (but my hosting provider holds my MX records for the domain, and fetchmail pulls them down from boxes I created there).
I’m scratching my brain, but I’m sure I am missing something simple. Perhaps I need to re-run dpkg for exim config and it will jump out at what needs to be changed.
Hi Chris, it is probably worth checking the Exim logs first
sudo tail /var/log/exim4/mainlogfor any errors. If there are failures see if you can work out what is causing them. Try things like connecting from the RT host to the SMTP service on your email server via telnet –telnet smtp.example.com 25to establish you can connect. Some ISP’s will block SMTP connections to external providers (Authenticated SMTP over TLS on port 587 usually gets around this). Let me know how you get on.It appears to be able to send to internet email domains that are not example.com, such as newexample.com — however. I’ll take a look Monday when I get back in the office and I will provide an update once I check the logs. Thanks!
Hi,
This looks like the best guide I have seen so far. I ran in to a couple of hiccups, probably due to my particular hardware (esx5) and distro (ubuntu12.04)
On the section where you add these 2 lines to the /sites-available/default
Include /etc/request-tracker4/apache2-modperl2.conf
RedirectMatch ^/$ /rt
I then get a problem restarting apache, saying it could not open the configuration file because there is no such file or directory… fail
do you have any suggestion?
many thanks
Sam
Hi Sam, can you post the error message? Check the last few Apache2 errors using the command
tail /var/log/apache2/error.logand you should be able to see what is wrong. Also double check the apache2 default available sites config for typos, and make sure</VirtualHost>is on the last line. Let me know how you get on.Hey,
The last step, copied from putty:
rtadmin@RT03:~$ sudo service apache2 restart
apache2: Syntax error on line 237 of /etc/apache2/apache2.conf: Syntax error on line 40 of /etc/apache2/sites-enabled/000-default: Could not open configuration file /etc/request-tracker4/apache2-modper12.conf: No such file or directory
Action ‘configtest’ failed.
The Apache error log may have more information.
…fail!
rtadmin@RT03:~$
the log file appears not to say too much:
[Wed Jul 17 23:21:51 2013] [notice] Apache/2.2.22 (Ubuntu) configured — resuming normal operations
[Wed Jul 17 23:21:51 2013] [notice] SIGUSR1 received. Doing graceful restart
[Wed Jul 17 23:21:51 2013] [notice] Apache/2.2.22 (Ubuntu) configured — resuming normal operations
thanks for helping me get this going. until i found this i was running all over the place for dependencies.
Sam
I’m afraid you may head-desk when you spot it. Don’t worry, it happens to all of us. Open up the default config again and change
Include /etc/request-tracker4/apache2-modper12.conftoInclude /etc/request-tracker4/apache2-modperl2.confAs soon as I posted I head-desked! Sometimes it takes sounding out loud the really silly things before realizing what is wrong. Thank you so much. I now have a working RT4 🙂
Hi Ben
Ubuntu/Aptitude so far only have the packages for version 4.0.4 of RT. Can you point in the right direction for upgrading to newer version. 4.0.4 gives lots of warnings about “Possible cross-site request forgery”
Sam
Hi Sam, the CSRF error usually comes up if you are accessing RT using a different hostname/port number to what it is expecting (for example using the IP address or connecting over SSL). You can add allowed hostnames/ports to the config following the documentation here. The other option is to disable RestrictReferrer, but I don’t recommend it.
As far as upgrading to a newer version you can look at apt pinning, or you could install from source. Neither of these options are perfect. The Debian and Ubuntu package pages are also worth a look to see what the current status is.
First of all…this is a real lifesaver article you wrote here! I’ve been using RT 3.8.7 for 3 years and i’m testing a new version of it (the mobile theme is a necessity!)
I bumped on an error when i was installing the required packages, it said that perl-doc package was missing…so i canceled the instalation, run apt-get install perl-doc, instaled this package and after that it was a breeze!
5 star article! 5 star ticketing system!
Thanks again for your effort!
Hi Nuno, thanks for the feedback. Glad it worked for you! BTW, Apt should take care of any dependencies like perl-doc and install them automatically.
Hi,
Could you please assist with “Possible cross-site request forgery”
I just cant seem to get rid of this.
Hi,
Ignore the previous question.
I added my web address to Set($WebBaseURL , “http://mydomain.com”) and that resolved the issue.
Thanks
Hi Anees, glad to hear that worked.
Hi, I now seem to be stuck at receiving incoming emails. Would you be able to assist me with this please.
I tried using the Incoming mail gateway configuration but I am still not receiving any incoming emails.
I need to be able to log tickets via email but I cant receive any incoming emails to RT can anyone please assist.
Hi Anees, a good place to start is to double-check the details in /etc/fetchmailrc against your email server settings. Your email server may require TLS/SSL (Google Mail requires these), IMAP, or something else which may require extra config.
Next I would try connecting from the RT host to your mail server manually using telnet:
telnet pop3.example.com 110

user rt@example.com

pass reallygoodpassword
If you can’t connect at all you may have a firewall problem, or the mail server doesn’t support POP3 on port 110. If you can connect this step should also help you see if the password is set wrong, and that the username is correct.
If you still can’t see the problem have a look through the fetchmail logs (
tail /var/log/mail.logwill show the most recent mail logs) and see if there are any errors. Keep in mind Fetchmail is setup to only runs every 60 seconds, so there may be a minor delay.Let me know how you get on.
Hi, thanks for the response.
I done a telnet and was able to log onto the system using pop and not pop3
root@rt:/home/administrator# telnet pop.118contact.com 110
Trying 10.10.10.10…
Connected to mail.example.com.
Escape character is ‘^]’.
+OK Hello there.
rt@examplecom
-ERR Invalid command.
user rt@example.com
+OK Password required.
pass Mypassword
+OK logged in.
Aug 29 11:13:41 rt fetchmail[1505]: 1 message for rt@example.com at pop.example.com (4005 octets).
Aug 29 11:13:50 rt fetchmail[1505]: reading message rt@example.com@dedi8.cpt3.host-h.net:1 of 1 (4005 octets) flushed
Aug 29 11:14:50 rt fetchmail[1505]: 1 message for rt@example.com at pop.example.com (1744 octets).
Aug 29 11:14:51 rt fetchmail[1505]: reading message rt@example.com@dedi8.cpt3.host-h.net:1 of 1 (1744 octets) flushed
Aug 29 11:16:52 rt fetchmail[1505]: 1 message for rt@example.com at pop.example.com (1744 octets).
Aug 29 11:16:53 rt fetchmail[1505]: reading message rt@example.com@dedi8.cpt3.host-h.net:1 of 1 (1744 octets) flushed
I figured out why I was not receiving any of my emails. I had changed the name of my queue on the web gui and forgot to update it on the linux side of things resulting in the mail not knowing where to go to.
I set both to the same name and is now able to receive and send mail.
Thanks for all the assistance.
Hi, that is good to hear. Checking the queue name and URL in fetchmailrc were going to be my next suggestions. I will update the guide to make this a bit clearer.
Hi Ben,
I managed to change the logo using the theme editor.
I would like to know if there is any way that I can remove or edit the logo at the bottom of the page that shows the best practical logo and description.
Hi Anees, you could manually edit the footer file and remove the logo. Keep in mind that removing the Copyright notice can be viewed as a license violation. That and it is always nice to give credit to the people who make a great product.
No problem read up on this and decided not to remove the name and logo.
I now need some assistance with confirmation emails. I setup RT to user me@example.com but now the system does not send out any confirmation emails to any address that has example.com. I sent emails from gmail and other webmails and the confirmation email get sent.
I think the system is regarding all emails from example.com as looping messages.
How to do I fix this?
Hi Anees, given the number of variables it is hard to give a definitive answer. I would start looking through the mail logs on the RT server and the upstream mail server/s to try and isolate the issue.
Hi, how do I reset the ticket count back to 1
Hi,
I need help setting up the shredder option as I would like to drop tickets and queues that are no longer needed after testing.
Hi Anees, there is a pretty good rundown of the Shredder options (and some alternatives) here. If you want to remove all tickets I would look at deleting them using SQL, or doing a clean install.
Shredder is very handy for deleting the odd ticket (say something highly confidential that accidentally got emailed) but it can have issues when dealing with lots of tickets. That said, if you only have a few hundred test tickets it should be fine.
Thanks for your previous update.
I need more assistance please. what does this error mean:
The system is unable to sign outgoing email messages. This usually indicates that the passphrase was mis-set, or that GPG Agent is down. Please alert your system administrator immediately. The problem addresses are:
rt@example.com
Hi Anees, the only thing I can think of is check the RT config file
sudo nano /etc/request-tracker4/RT_SiteConfig.pmand make sure that GnuPG isn’t enabled.Thanks Ben,
I done a clean install (quicker)
I can’t remember how I overcame this previously but can’t seem to fix this now.
My response mail give the following error:
R=dnslookup T=remote_smtp: SMTP error from remote mail server after MAIL FROM:
How do I remove the www-data@example.com or change the address.
2013-10-10 15:23:34 1VUGDG-0000hc-CB <= www-data@example.com U=www-data P=local S=824 id=rt-4.0.4-1688-1381411413-217.1-6-0@APLISO
2013-10-10 15:23:41 1VUGDG-0000hc-CB ** me@example.com R=dnslookup T=remote_smtp: SMTP error from remote mail server after MAIL FROM: SIZE=1871: host mail.example.com [xxx.xxx.xx.xxx]: 550-Verification failed for \n550-Unrouteable address\n550 Sender verify failed
2013-10-10 15:23:41 1VUGDN-0000hh-Fn <= R=1VUGDG-0000hc-CB U=Debian-exim P=local S=1847
2013-10-10 15:23:41 1VUGDG-0000hc-CB Completed
I am stuck just cant get past this error……
Hi Anees, run through the Exim config again
sudo dpkg-reconfigure exim4-configand make sure everything is correct. For the 550 error have a look at how Exim authenticates to your upstream SMTP server (there are some links above).Hi Ben thanks for all you assistance in helping me configure Request Tracker.
I see that Request Tracker 4.2 is now available and the version I have installed is v4.04.
How would I go about upgrading to the latest version.
Hi Anees, glad to help. Yes, 4.2.0 is out and looks very good. At the moment there are no packages available so the only way to upgrade is manually installing from source, or creating your own packages. There is an Ubuntu Launchpad page for RT 4.2.0 to follow the progress.
Hi Ben,
I have posted this question before but still cant find a resolve for it.
I have set up the system with a domain name and a mailname using eg. example.com
My email address is user@example.com (same as the domain).
When doing a test to mailx -s “Exim4 email Test” you@example.com < /etc/fstab using user@example.com I get no response.
When I do the same test to user@gmail.com to mailx -s "Exim4 email Test" you@example.com < /etc/fstab I get the response.
The same when I log a ticket via email to RT, I can log the ticket via email using user@example.com but do not get the auto reply or any other updates made to that ticket
When logging a ticket via email using user@gmail.com the ticket get logged and an auto reply get sent immediately.
Any thoughts why this would occur?
So in short any email account that has the domain name example.com does not get any updates via email as RT mailname is example.com, any other mail account works fine.
Please help.
Hi,
With lots of thinking and searching I found that adding in Set(Set($RTAddressRegexp , ‘example.com’ this allowed email responses to come to user@example.com.
Thanks
i got error while restarting fetchmail. {Auth failed]
Hi, you will probably need to adjust your settings. It could just be a typo. Have another look over the settings, and if you make any changes restart fetchmail again.
I am very new at this kind of installations and configurations and I just wanted to say that this guide is very useful and clear. It saved my life!!!. Thank you for your job.
Hi Ben, hope you well.
I installed RT 4.2.3 and now having trouble installing an email client that will send and receive emails to RT. I tried fetchmail and exim4 but not getting any joy. Not sure if I am installing this incorrectly or if the settings has changed for RT4.2.3.
Any input will be greatly appreciated.
I used this as a guide: http://binarynature.blogspot.com/2013/10/install-request-tracker-4-on-ubuntu-server.html
Hi Anees, just a quick one. In that guide they install and use UFW (config tool for iptables). The ports for SMTP etc aren’t opened in the config they use, so you would need to add those exceptions (remember SMTP over SSL/TLS use different ports).
hola ben,
quisiera integrar rt4 con gmail pero me da error en las configuraciones… me podrias ayudar como searia la configuracion..
Awesome guide!
Thanks!!!
Very nice guide
Thank you!
Thank you !
I followed this and when I create tickets, I get an email notification. But when I try to reply to a ticket, it doesn’t work. I don’t know what is wrong. I have looked over main.cf, RT_SiteConfig.pm and fetchman and don’t see any issues. I am able to telnet 25 just fine. Any help is appreciated!!!